
~ Traditional Mooncake with Green Beans & Sunflower Seeds Filling ~
I was tempted to make my own Traditional Mooncake by Madam Yin Ying Yuk, AMC East Malaysia Director, who shared her homemade Mooncakes posts on her Facebook page, “Amc Tawau” on the 16th August and 11th September. I would say her Mooncakes looked perfect, just like those made by the confectionaries, except that these are homemade and with the AMC Premium Cookware System. The Mooncakes looked so good that I could not resist making them for the first time. A renown blogsite, “Guai Shu Shu”, which I have been following has also boosted my confidence level in making my first attempt. Otherwise, no way a lazy cook like me would make Mooncakes!
When I asked Madam Yin Ying Yuk what arouses her Mooncake making spirit, she has the following message for all, “中秋節是中国人的大節日. 我做月餅是要把中国人的文化傳下去,使到我们的後代也繼续傳給他們的孩子. 最重的是把我学到的食谱傳出去, 使到 AMC 朋友们可以和家人分亨自己親手做的中秋餅”. It is translated as “Mooncake Festival is an important Chinese festive day. I make Mooncakes to ensure that the Chinese Culture continues to pass on and inherited by our generations to come. Most importantly, I wished to share the recipe that I learnt and incorporated to all AMC friends, for them to be able to make their own Mooncakes to be savoured and enjoyed with their family”. I am truly inspired.

Traditional Mooncakes, courtesy of Madam Yin Ying Yuk (AMC Tawau). Don’t they look perfect?

Some Mooncakes with contemporary design, courtesy of Madam Yin Ying Yuk (AMC Tawau).

Shanghainese Mooncakes, courtesy of Madam Yin Ying Yuk (AMC Tawau).
After making 3 batches of traditional, non-fanciful Mooncakes, I have gathered some insights which I think a first timer may appreciate. As it was my very first few attempts with making Mooncakes, I thought it would be helpful to have a record of the mistakes that I have made too. Hence, this blog is not just about the success story but the failed and imperfect attempts. I am sharing some of the photos which shows some of my Mooncakes that have gone terribly wrong.
On my first attempt for Coarse Red Bean Shanghainese Mooncakes, I failed.

I burnt the sunflower seeds on my Shanghainese Mooncakes when I tried to brown them unnecessarily for the second time with Navigenio on high heat “=” for 2 more minutes.

Hollows in my Shanghainese Mooncakes fillings as I did not roll the fillings into ball shapes firmly in my hands.
On my second attempt for Green Bean Traditional Mooncakes, I failed again.

My Green Bean Traditional Mooncake ball was too big for the mould I am using, as a result of me not thinking ahead before weighing the fillings and crust doughs according to the mould size.

I literally feel “dumb” after I forced the doughs into the mould and created these oversized Mooncakes.

Burnt Traditional Mooncakes after I carelessly turn Navigenio on high heat “=” to bake for another 5 minutes.
From researching a suitable recipe to preparing the fillings, rolling up the crusts and to moulding & baking Mooncakes, there are some planning required. There is no shortcut in the entire Traditional Mooncake making process, which requires some preparation to be done at least a day or two earlier before serving. This is dreadful for a lazy cook like me but the satisfaction level can be sky high when I see the Mooncakes coming out nicely from the mould and baked to a beautiful brown. Hence, must try at least once in a lifetime.
Above all, you need to imagine making the Mooncakes to get into the mood of making them. Then, plan ahead to ensure you are able to commit with the advisable timing most Mooncake bloggers, seasonal bakers or experts would recommend in order to complete the process. You may want to work around your daily busy routine in order to incorporate your time and energy for Mooncake making with the following requirements :-
- Preparation of the fillings (can be half or a day ahead of baking day)
- Preparation of the crust/skin (can be half or a day ahead of baking day)
- Moulding and baking (require about 2 hours, depending on individual’s “handy crafting” speed)
- Season before serving (1-2 days after baking day)
Here are the few tricky parts to note along the making process :-
- Ensure firm fillings – Fillings must neither be too dry nor wet. A firm and non-sticky texture would be ideal for easy crust wrapping over the filling later on. If the filling is too dry, it will not form a ball that comes together or it will fall apart into pieces. If the filling is too wet, the ball shape will be easily squashed to go off-shape when the crust is to be wrapped on around it. Hence, making it difficult or impossible to nicely close up the fillings with the crust. The balance in the filling ingredients, water level, oil amount and sugar plays an important role for the success of a nicely moulded Mooncake. The right fillings appear non-sticky to the mixing bowl.
- Measure the size of Mooncake balls to fit into the mould – Determine the size of Mooncake balls/dough for fitting to the moulds that you are using beforehand. This can be done by measuring a sample size of the filling. Then, the size of fillings and crusts can be estimated more accurately with a balance in filling size and crust size.
- For an even crust around the filling, finger massage it! – Crust dough should be form from a ball shape to a flat round dough to before wrapping up the filling placed on a cling wrap. Ideally, the flattened round doughs should be a little thicker on the side than the middle part to ensure sufficient crust dough for closure of the filling in each Mooncake. Gently push the crust doughs with your fingers to close the opening, like you are giving it a massage.
With some practise, I believe everyone can make Traditional Mooncakes. It is just a matter of how perfectly one wants them to be. I think if I were to make them again, I will not be able to clone them. Each and every one of them will be uniquely done just like handicrafts. That what makes handmade (homemade) Mooncakes special in a way. I feel that this year’s Mid Autumn Festive Day is especially meaningful as I have learnt to appreciate more of the making of Traditional Mooncakes by making them myself, which I have never believed I can.
Traditional Mooncake Red & Green Bean Recipe (Yield 6 x 100 grams Mooncake) :
A. Filling
- 150 grams Green Beans or Red Beans
- 50 grams Dark Palm Sugar (Gula Melaka)
- 150ml of Water
- 8 tablespoons Olive Oil
B. Crust Dough
- 120 grams Hong Kong Flour or Cake Flour
- 70 grams Golden Syrup
- 30 grams Cooking Oil
- 4 grams Alkaline Water/Lye Water
- 1 Egg Yolk
- 1 tablespoon Soy Milk or Milk
- 1 tablespoon Oil
- 1 sheet Cling Wrap (approximately 30cm x 45cm)
- 1 pair of Food Grade Plastic Gloves.
- 1 Mould for 100 grams Mooncake with Pattern of your Choice.
AMC Healthy Cooking Method :
A. Fillings
- Place red bean paste, palm sugar and water into an AMC 20cm 3.0 liter Pot unit and cover it with a 20cm AMC Secuquick Lid. Turn on Navigenio Set to cook on Turbo for 40 minutes.
- When pot depressurised, remove lid. Leave to cool for about an hour. Add olive oil to the cooked green beans and blend the mixture in the pot with a handheld blender to create a paste texture.
- Refrigerate if filling are to be used the following day. Remove from the refrigerator an hour before moulding.

Add all filling ingredients and cook for 40 minutes with the AMC Secuquick Softline lid on a Pot unit.

Cooked green beans without much water may look a little dry but that’s alright as we do not want the beans to be overly wet when blended into paste.

The right paste texture should come together and does not sticking to the pot.
B. Crust Dough
- Pour Golden syrup, oil and alkaline water into an AMC 16cm Combi Bowl. Place flour into an AMC 20cm serving dish. Pour the wet mixture into the flour and mix well.
- Set aside for 2 hours to 4 hours. You may leave it in the refrigerator overnight too. The longer the crust dough is set aside, the easier it is to work with later on.

All ingredients required for crust.

Prepare wet and dry ingredients separately.

Pour the wet ingredients into the dry. (Note: I did not use a Combi Bowl unit for the wet ingredients as suggested as all 4 of my 16cm Combi Bowls were in used.)

Mix the wet and dry ingredients well.

Crust dough will form like magic as you mix them well together.

Smoothly mixed crust dough.
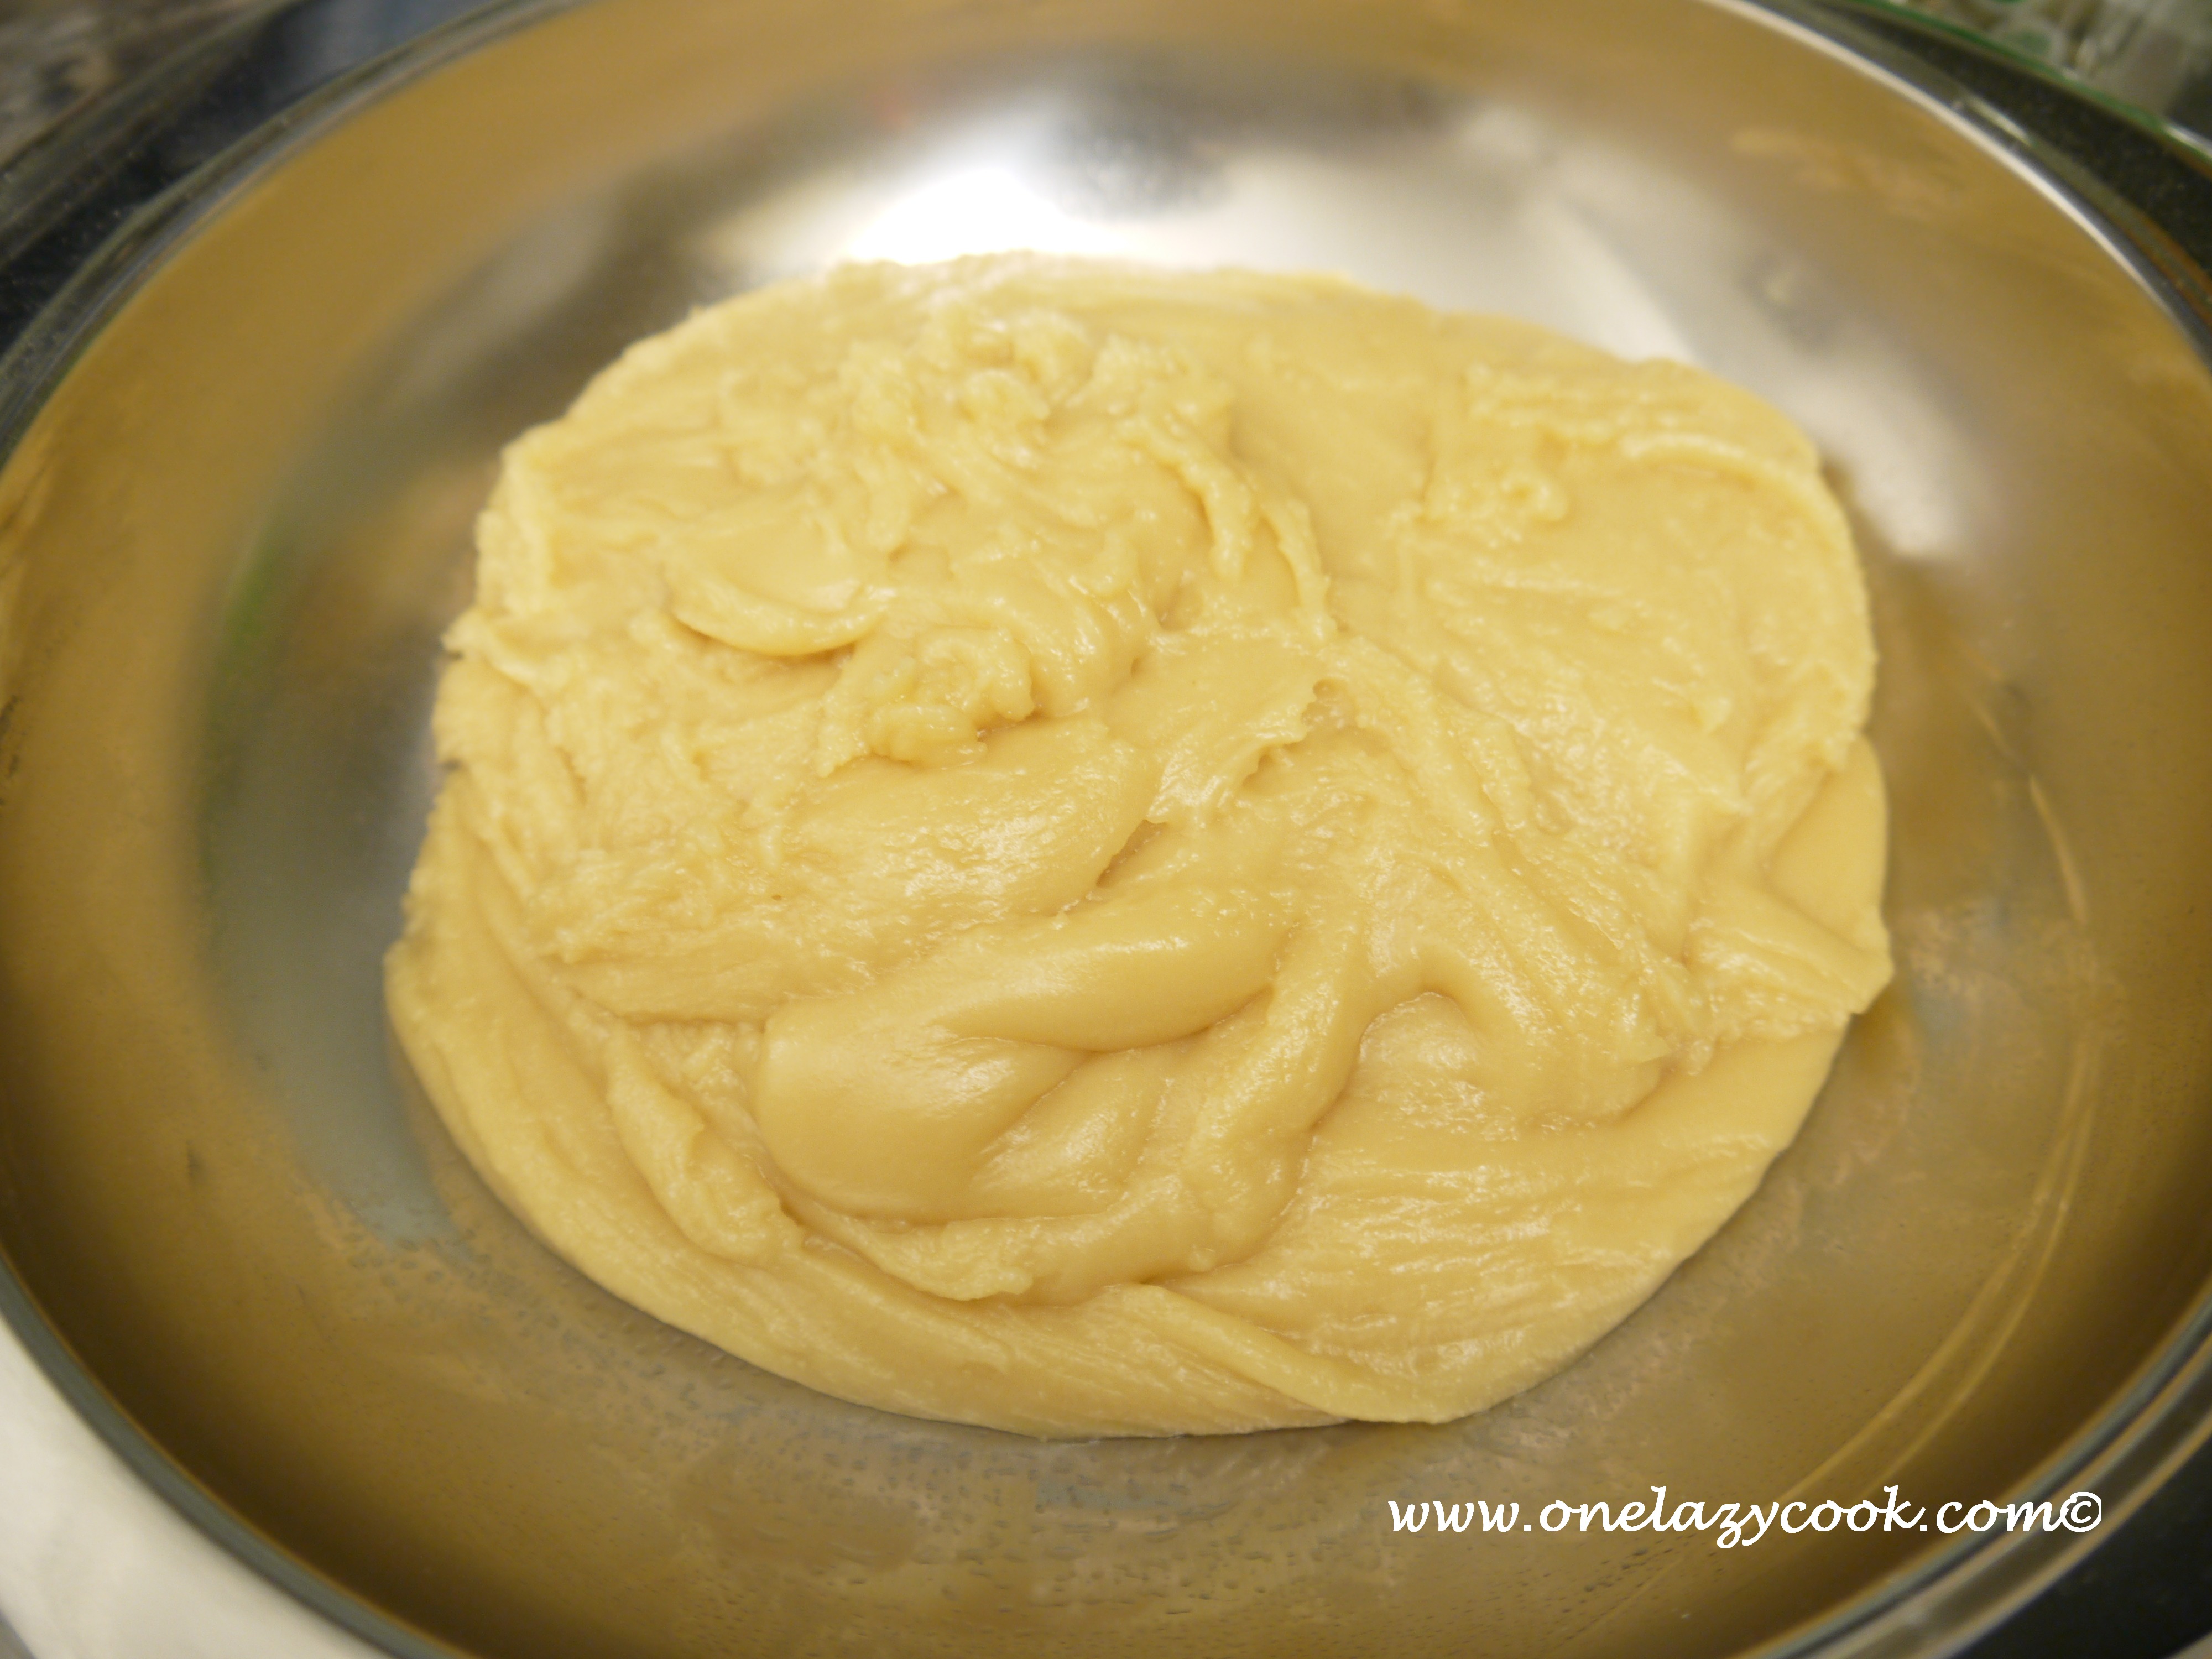
This is how it looks like after more than 4 hours sitting in the Serving Dish covered with cling wrap. This is the stretchy texture that enables moulding.
C. Moulding
- With gloves on, divide crust doughs into 6 portions and roll them into balls. Each ball should weight around 35 grams. Then, divide fillings into 6 portions, squeeze to firm and roll them into balls. Each filling ball should weight around 65 grams.
- Work on one crust ball at a time. Place crust ball on the cling wrap. Gently flatten the ball shape into a flat dough by slowly massaging them with your fingers to avoid cracks.
- Place a filling ball in the middle of the flattened dough. Wrap up the filling over the cling wrap. Gently push the crust dough upwards to close up the entire filling ball smoothly. Roll the crust wrapped ball to even out the skin on filling or massage the ball gently to avoid cracking.
- Place the ball into the mould. Gently press the ball into the mould until it is flat in the mould. This flat surface will form the base of the Mooncake. Turn it upside down and release the Mooncake from the mould onto a flat plate.

Weight and roll the fillings into ball shape.

Weight and roll the crust dough into ball shape.

From a ball, gently press the dough to flatten it to a circle wide enough to wrap up a filling.

This is about right. Ensure flattened dough has no holes or not overstretched.

Over the cling wrap, roll up the crust dough to wrap the filling.

Gently massage the dough upwards to cover each filling.

Tada…. a Mooncake ball is born!

Gently roll all areas to ensure an even crust covering the filling.

Gently push the rolled up Mooncake balls into the mould. Flatten the base.

Push the Mooncake out of the mould.

The imperfectly moulded Mooncakes were born.
D. Baking
- Mix egg yolk, milk and oil well, Sieve for watery texture. Set aside for later use in step 5 below.
- Preheat an AMC 24cm 5.0 liter Pot unit on Navigenio heat “level 2” up to “Meat Window” or 50 °C.
- Place the Mooncakes into the pot. Cover pot with lid. Bake on Navigenio heat “level 2” for 5 minutes to brown the bottom crust.
- Remove lid, turn lid upside down and place pot on the upturned lid. Cover pot with Navigenio. Turn Navigenio on lower heat level “–“. Activate Audiotherm to bake for 10 minutes.
- When Audiotherm beeps, turn off both Navigenio & Audiotherm. Brush the watery egg mixture onto the Mooncakes top. Cover pot with Navigenio again. Turn Navigenio on lower heat level “–“. Activate Audiotherm to bake another for 5 minutes.
- When Audiotherm beeps, turn off both Navigenio & Audiotherm. Leave mooncakes to cool before removing from pot. Consume within 3 days or refrigerate for later consumption.

Preheat the AMC 24cm 5.0 liter Pot with Navigenio heat level “2”.

Place all Mooncakes into the Pot unit. Cover lid and leave them to bake for 5 minutes in the pot.

Remove lid and cover pot with the Navigenio unit to bake for 10 minutes.

Remove Navigenio and brush some watery eggs ( the proper term is “egg wash”) on the surface of the Mooncakes with a brush.
Bake again for another 5 minutes to brown the mooncakes.
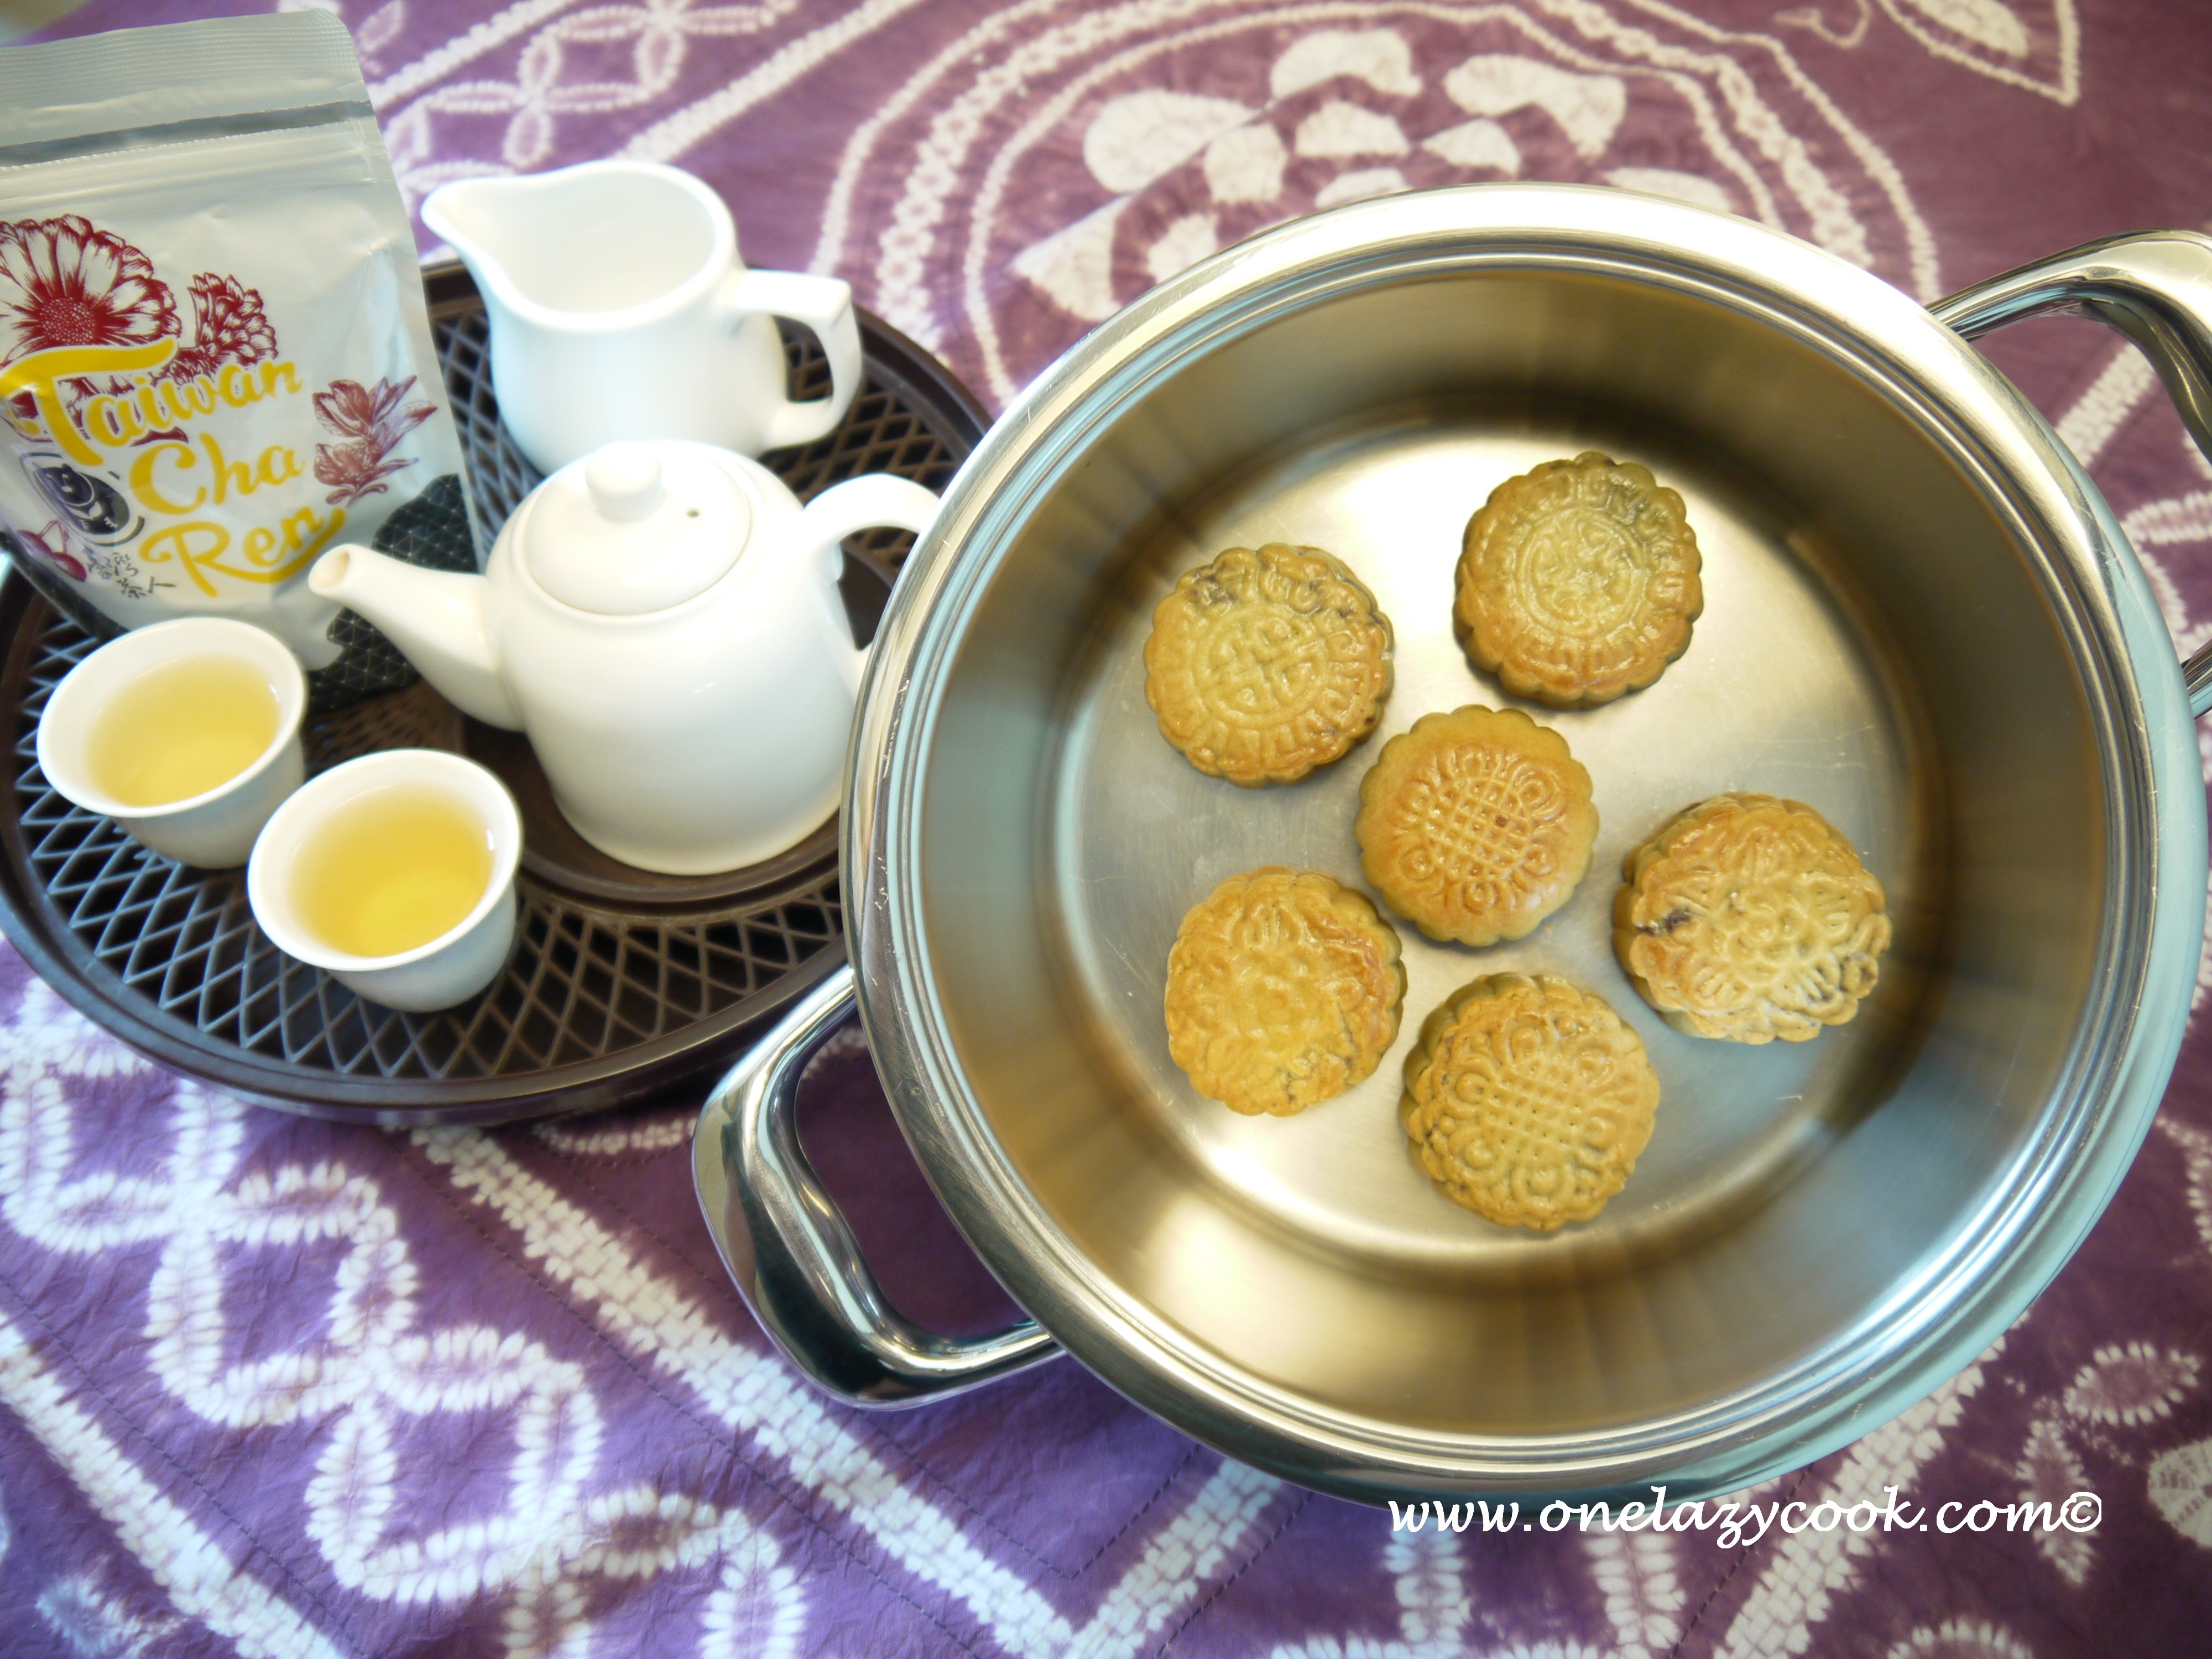
Baked Mooncakes ready with some tea from a Taiwanese neighbour.

Here are my prettiest batch of Mooncakes amongst the imperfect ones on a first few attempts.

Post-mortem photo of the Red Bean Mooncake! The filling looks a bit dry as I did not add as much oil required to make the paste but this homemade red bean paste, cooked with little water, tasted really good.

Another post-mortem on Green Bean Traditional Mooncake.
Tips :
- AMC Combi Bowl is ideal for baking and cooking use. The bowl rim is designed for neat pouring, where any wet ingredients do not drip onto the side of bowl and does not soil the table tops upon pouring. Hence, they are great when pouring wet ingredients/mixture into the dry ones. This would be especially handy when you involve young kids in any baking/cooking activities involving pouring of wet mixtures.
- AMC Serving Dish is great for dough making as it is deep enough to fill up the ingredients and shallow enough for our hands to work on any dough neatly.